Canreef Aquatics Bulletin Board  

Go Back   Canreef Aquatics Bulletin Board > General > Tank Journal

Reply
 
Thread Tools Display Modes
  #1  
Old 04-24-2014, 04:39 PM
FishyFishy!'s Avatar
FishyFishy! FishyFishy! is offline
Gold Member
 
Join Date: Sep 2010
Location: Calgary SE
Posts: 1,674
FishyFishy! will become famous soon enough
Default

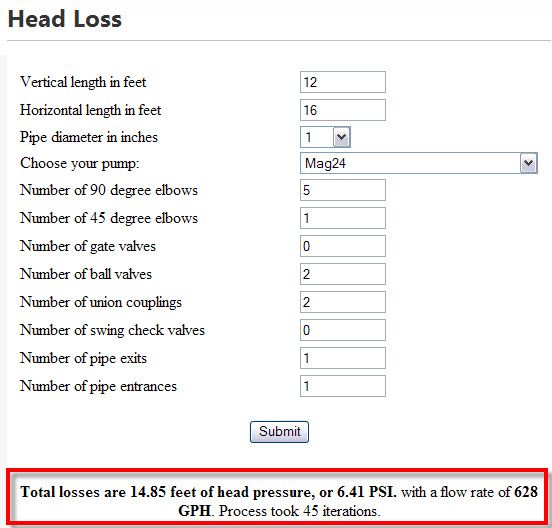
Took a head pressure measurement for the 2400 GPH Mag24. Looks like I should be getting 628 GPH out of the end of the pipe into the water change tank. That means I should be roughly 4 minutes to fill again.
__________________

They call it addiction for a reason...
Reply With Quote
  #2  
Old 05-01-2014, 07:35 PM
FishyFishy!'s Avatar
FishyFishy! FishyFishy! is offline
Gold Member
 
Join Date: Sep 2010
Location: Calgary SE
Posts: 1,674
FishyFishy! will become famous soon enough
Default It's Wet!

Got the water change tank all set up and running.


The Mag24 sure does push water.

I did find one small leak though. After about 15 minutes of running, it was only one small drip. It's coming from the middle joint on the verticle pipe here, right before the ball valve. Any ideas on how to seal that? Should I just try more glue around the joint?

__________________

They call it addiction for a reason...
Reply With Quote
  #3  
Old 05-01-2014, 08:42 PM
Delphinus's Avatar
Delphinus Delphinus is offline
Member
 
Join Date: Dec 2001
Location: Calgary
Posts: 12,896
Delphinus has a spectacular aura aboutDelphinus has a spectacular aura aboutDelphinus has a spectacular aura about
Send a message via MSN to Delphinus
Default

That looks awesome! I like the spinny water exit pipe thing on the left side bucket.

Yeah, you could just try more cement around the joint in question. It might look like butt afterwards but it should work.

Alternatively you could hacksaw it apart, pry the pipe pieces out of the joints and redo it. Takes a bit of elbow grease but it's do-able.

Or if you can get some clear PVC cement, you could just use that. You can get clear at Western Pump.
__________________
-- Tony
My next hobby will be flooding my basement while repeatedly banging my head against a brick wall and tearing up $100 bills. Whee!
Reply With Quote
  #4  
Old 05-01-2014, 08:58 PM
FishyFishy!'s Avatar
FishyFishy! FishyFishy! is offline
Gold Member
 
Join Date: Sep 2010
Location: Calgary SE
Posts: 1,674
FishyFishy! will become famous soon enough
Default

Quote:
Originally Posted by Delphinus View Post
That looks awesome! I like the spinny water exit pipe thing on the left side bucket.

Yeah, you could just try more cement around the joint in question. It might look like butt afterwards but it should work.

Alternatively you could hacksaw it apart, pry the pipe pieces out of the joints and redo it. Takes a bit of elbow grease but it's do-able.

Or if you can get some clear PVC cement, you could just use that. You can get clear at Western Pump.
Thanks!

Yeah I'm going to try some more cement for now. It's definitely a small leak. I don't really care what it looks like, because it's in the laundry room. I have to run to western pump for some spaflex anyways, so I'll pick up some clear while i'm there!
__________________

They call it addiction for a reason...
Reply With Quote
  #5  
Old 05-02-2014, 01:09 AM
kien's Avatar
kien kien is offline
¸.·´¯`·.´¯`·.´¯`·.¸¸.·´¯`·.´¯`·.´¯`·.¸¸.·´¯`·.¸¸. ><(((º>
 
Join Date: Apr 2009
Location: Calgary, AB
Posts: 7,665
kien will become famous soon enoughkien will become famous soon enough
Default

that looks BOSS! I need to make one of these !
Reply With Quote
  #6  
Old 05-09-2014, 04:44 PM
FishyFishy!'s Avatar
FishyFishy! FishyFishy! is offline
Gold Member
 
Join Date: Sep 2010
Location: Calgary SE
Posts: 1,674
FishyFishy! will become famous soon enough
Default

Quote:
Originally Posted by kien View Post
that looks BOSS! I need to make one of these !
Why thank you!

Got the drain all connected and plumbed. I decided to tap into an existing drain pipe in the laundry room instead of using the floor drain. I thought that the flow from the water change sump might be too much for the floor drain, and I would have to wait for it to drain at a certain speed. This was a little more difficult because there was paint on the pipes. So lots of primer later to get a good solid surface, it looks solid.


Drain comes out into the laundry room


Then goes into an existing drain pipe (from the kitchen sink).


Also go the return lines from the water changing station back into the tanks. The one on the left will be for saltwater to fill the water change tank. The one on the right is to fill my ATO container with RO water. I will leave it all hooked up and ready to top up my ATO resevoir until I have to do a water change.

I also ran an extension cord so that I can just flip a switch on my American DJ powerbar to activate the Mag24 to top up the RO water from upstairs.

__________________

They call it addiction for a reason...
Reply With Quote
  #7  
Old 05-09-2014, 04:54 PM
FishyFishy!'s Avatar
FishyFishy! FishyFishy! is offline
Gold Member
 
Join Date: Sep 2010
Location: Calgary SE
Posts: 1,674
FishyFishy! will become famous soon enough
Default

Another upset with my RO/DI system though.... I had a vendor order me 3 replacement canisters for the RO side. Came in.... and the threads are different!!! They won't screw in to my BRS unit. The threads on these seem a lot more coarse.

These are now for sale... Anyone need any?? Cheap!


And my poor RO unit :-(


Looks like I will have to bite the bullet and order them for $20 a pop from BRS. And deal with the ridiculous shipping charges and the silly UPS wait times.... .UURRRGGGH
__________________

They call it addiction for a reason...
Reply With Quote
Reply


Posting Rules
You may not post new threads
You may not post replies
You may not post attachments
You may not edit your posts

BB code is On
Smilies are On
[IMG] code is On
HTML code is Off
Forum Jump


All times are GMT. The time now is 04:32 AM.


Powered by vBulletin® Version 3.7.3
Copyright ©2000 - 2025, Jelsoft Enterprises Ltd.