
|
|
|
|
|
#1
 03-19-2013, 02:35 AM
|
||||
|
||||
|
Right, because the sole purpose of a fuge is nutrient transport and the removal of nitrates. Looking through your tank journal, looks like you went with pellets over having a fuge. Is one method deemed as better than the other?

|
|
#2
03-19-2013, 02:50 AM
|
|||||
|
|||||
|
Quote:
Ya, version 1.0 of my sump had a fuge because I planned on that being my nutrient export method. I quickly found that chaeto didn't grow all that well In there tho (for reasons unknown to me). And then 6 months later BioPellets came out and I gave them a shot. They pretty much worked for me right away. It was at that time that I decided I no longer needed a fuge so scrapped my sump and built a new one without a fuge in favour of a larger reactor chamber to house a larger BioPellet reactor. Anyway, lots of people use fuges with success but if you already plan to run BioPellets you may be negating a fuges nutrient export function.
|
|
#4
03-19-2013, 03:27 AM
|
||||
|
||||
|
Quote:
Last edited by DigitalWeight; 03-19-2013 at 03:30 AM. Reason: added dimensions
|
|
#6
03-19-2013, 03:46 AM
|
|||||
|
|||||
|
Quote:
If the current skimmer section is too deep you have two options. 1. Drop the height of the water or 2. Simply elevate the skimmer into a platform using egg crate or some such thing. Keep in mind the additional cabinet clearance to raise the skimmer tho. You don't want to make it difficult to remove the skimmer cup! If you decide you want to drop the water level of the skimmer section (and you still want to keep your fuge, you can swap your return and fuge section in your diagram. From left to right it would be, Fuge-bubble trap-return-bubble trap-skimmer. With the return in the middle all three sections can be independent heights. However, doing it this way means you will have to send an additional drain line to the refugium. Just T off the main drain line and send some water to the refugium and some to the skimmer. I guess if you didn't want to do it this way another option is to swap the fuge and skimmer sections. From left to right: return-bubble trap-skimmer-bubble trap-fuge. Drain the tank into the fuge and water flows and drops to skimmer and then flows and drops to return section.
|
|
#7
03-19-2013, 04:08 AM
|
|||||
|
|||||
|
You mentioned you were concerned about flooding. A very legitimate concern with sumps when power fails and you get water flooding back into the sump. Looking at the spec of that tank I think it is 20" wide X 18 long. If you lose the top 2" of water and the volume of the overflows your looking at somewhere around 3 gallons+ of water. There's 231 cubic inches per gallon so it's fairly easy to figure out roughly how much will make it back to the sump. Just make sure you have that room in cubic inches above the operating water line in your sump + a bit for margin of error. Freaky the first time you do it, but you get comfortable with it quick.
As far as the skimmer goes, it's nice to keep the water volume so sitting your skimmer on egg crate works well to lift the skimmer. I cut 3" abs pipe to 6" lengths to lift mine then drilled the sides with a bunch of 2" holes so water wouldn't get trapped inside them. With the holes in the side, water flows through them. To save a bit of room I only put 2 baffles between the skimmer and the next chamber. Personally I think the first baffle in the skimmer section is redundant and unnecessary. This is when I was leak testing mine: 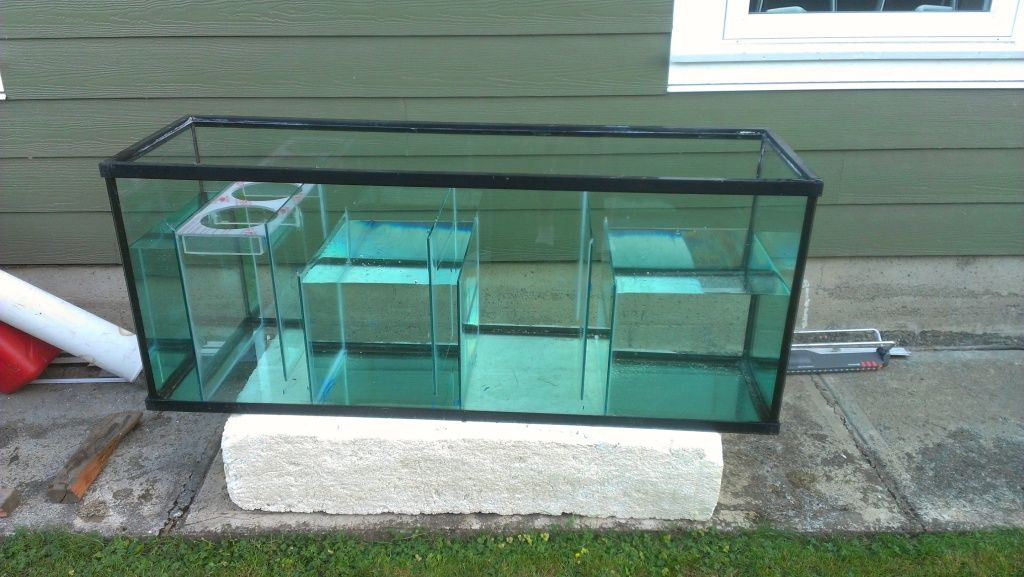 The chamber on the left that's holding water is my skimmer chamber. Notice only 2 baffles. I also only put 2 baffles in the next chamber, but if you wanted your refugium with sand there, you'd have to have 3 like you have in your schematic to hold the sand in place.
|
|
#8
03-20-2013, 12:08 AM
|
||||
|
||||
|
Quote:
Thanks for the feedback - I appreciate the calculation for flooding - I will need to work that into the design. In terms of two or three baffles I have read both sides of the argument. I think what I should do is lay everything out when it comes in and decide from there. If I have room, I would more than likely go with three baffles before the return to minimize the bubbles entering the DT. Does that sound like a reasonable option?
|
|
#9
03-20-2013, 12:17 AM
|
||||
|
||||
|
Quote:
In which section do your reactors work in - how do you have that set up?
|
|
#10
03-19-2013, 03:03 AM
|
||||
|
||||
|
The last straw was last week when my cleaner shrimp, which was the oldest inhabitant in my tank, got its ass kicked and succumbed to this beast. So I tried the bottle trap trick, the glass jar trick, and even tried to bait it with a net in the hope that I would be able to humanely dispose of him to one of the stores in town. Alas, it was too quick or too smart for me. Tonight though I triumphed. I found one of his hiding spots and flushed him out with a coat hanger and chased him around the tank for a good 45 minutes. I think I tired him out and all his usual hiding spots felt no longer safe. He ended up coming out into a clearing when I impelled him with a shish kabob skewer. Here is the photographic evidence.  Feel kinda bad for him, but he was not very nice to me or my other tank inhabitants. Good riddance.... P.S. My wife is ****ed and I am no longer allowed to take any more kitchen utensils for use with the tank.
|
 |
| Tags |
| aio, digitalweight, nano, tank journal |
|
|


 Hybrid Mode
