 |
|
#41
|
||||
|
||||
|
Looking good. The wall and ledges are very nice. Cant wait to see what you put in there.
__________________
Nick |
|
#42
|
|||||
|
|||||
|
Thanks Nick, it was a pleasure doing business with you.
|
|
#43
|
||||
|
||||
|
Likewise, i look forward to seeing your tank progress (and am curious what you will come up with for the legs).
__________________
Nick |
|
#44
|
||||
|
||||
|
Love your glass top. This def has me thinking
__________________
Two clownfish were in a tank. One says to the other, how do i drive this thing? |
|
#45
|
|||||
|
|||||
|
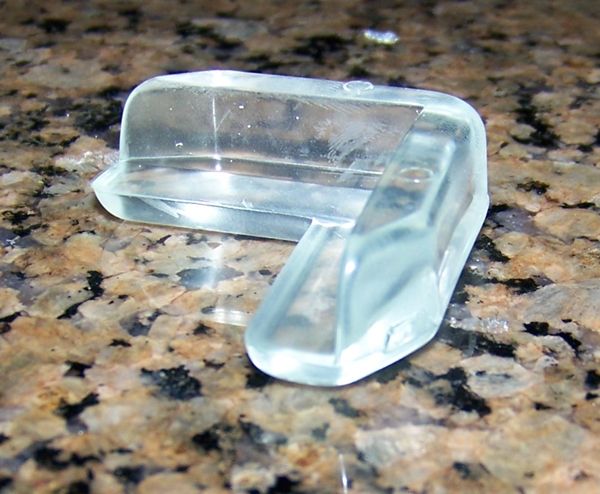
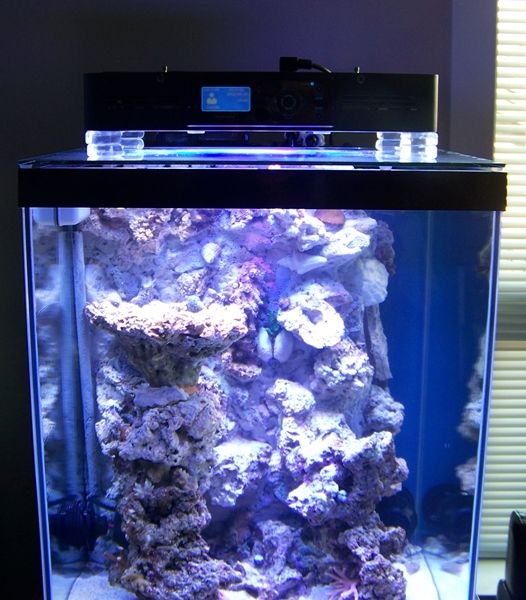
Over the past week I have been scratching my head about what to do about legs for the light. Scroll back and you'll read that my wife didn't want it hanging from the supplied cables in the living room. I just needed something to raise it up off the glass about an inch or so. I tried cutting some wood - looked like crap. I tried cutting some plastic pipe - looked like crap. I tried wedge shaped door stops - wife said it looked like crap. So I find myself at the dollar store and another rather dim light bulb
 For $1.25 I couldn't go wrong so I bought two sets. This is what they look like out of the package. They're rounded on the corners too just like the light - it was like a match made in heaven.  I liked the look of just one set under the light but I wanted just a titch more spread so I ended up going with two on each corner for the extra height. Looks like this.  So now I just need to align them properly and glue them together so they look a little neater. Leg problem solved until I see something better. |
|
#46
|
|||||
|
|||||
|
The tank is just finishing the awkward first algae bloom stage that has lasted about 5 days. The clean up crew of 3 hermits and a dozen large mixed snails are gaining the upper hand without me having to pull out the old toothbrush. I've had a self sustaining population of margarita snails for about 6 years and as soon as the algae started to grow they had a mass spawning event - pretty cool. I expect to start seeing small snails everywhere soon of which a few will grow to adulthood which has been the typical cycle for them in the past.
My first try with LED lighting is proving to be a learning experience. I originally had the unit maxing out at 60 percent for 4 hrs and tapering on/off for the other 4hrs on both ends of a 12 hr cycle. I took some ugly old frags from another tank that were sitting under a 250w MH and placed them around the tank in the bottom 6 inches or so. Within 2 days some had faded badly to the point of looking bleached. Within a week others that were no more than brown lumps showed remarkable colour change and growth. By trial and error I have found my areas of highest par (no meter for this poor boy), moved the corals accordingly, and ramped the lights down to 40 percent max for now. My plan is to ramp up 5% per week until I find the sweet spot. Overall I'm really pleased with the LED light and at this point in time couldn't imagine going back to MH or fluorescent bulbs. A post isn't complete without pictures so here's a good thing from this week. I received a great box from whatcaneyedo:  No sooner had they been unpacked and I had to go to work for 8 hours. So I left strict instructions and a turkey baster with the better half and the corals had a 9 hour acclimation until I got home close to midnight.  The most fun was comparing the size of the bristle worms that were hidden under each piece of styrofoam. Must of ended up with about 50 of the buggers plus a few small stars. I haven't got the hang of the shooting through the glass AND getting the right colours yet but here's a few of my better shots of some of my existing pieces and the corals that shipped in.  I think this is a green cactus coral that has encrusted but hasn't sent up its "leaves" yet.  Purple Pocillapora  Red monti (got a green and purple as well)  Green with purple tips acropora  |
|
#47
|
||||
|
||||
|
It is starting to look really good in there. Nice additions. I have found in my own learning experience that the montis need very slow ramp up as i have bleached both that i added with all the other corals that seem to be loving the high light.
__________________
Nick |
|
#48
|
|||||
|
|||||
|
Really enjoyed reading through this thread Cubeman! Very well done on that rock wall, I was pretty impressed with the epoxy/sand and then taking it a step further by sand coating the powerhead wire. Very clever and well thought out.
Can't wait to see the coral grow out and see some fish get in there. Well done man, lots of ideas now for my next one! |
|
#49
|
|||||
|
|||||
|
+1 on the monti's Nick - that has been my experience too
|
|
#50
|
|||||
|
|||||
|
Quote:
|