
|
|
|
#242
 08-19-2010, 12:01 AM
|
|||||
|
|||||
|
Quote:
Quote:
Quote:
__________________
260g mixed reef, 105g sump, water blaster 7000 return, Bubble King SM 300 skimmer, Aqua Controller Jr, 4 radions, 3 Tunze 6055s,1 tunze 6065, 2 Vortech MP40s, Vortech MP20, Tunze ATO, GHL SA2 doser, 2 TLF reactors (1 carbon, 1 rowa). http://www.canreef.com/vbulletin/showthread.php?t=50034 . Tank Video here http://www.vimeo.com/2304609 and here http://www.vimeo.com/16591694 
|
|
#243
08-19-2010, 12:02 AM
|
|||||
|
|||||
|
Quote:
|
|
#244
09-10-2010, 07:16 AM
|
|||||
|
|||||
|
So, this update has been a long time in coming. I'd like to blame the weather and doing summery things outside but looking outside right now I guess that can't be the only reason.
This update itself is also a bit late because I uploaded pictures to facebook first, then meant to upload them to a Shaw photoshare I use so I could update this thread but the Shaw photoshare won't let me upload pictures. I put in a support ticket 2 days ago and haven't heard back since. I think they've forgotten or don't really care. Anyhow, Picasa to the rescue for now. So where to begin the actual update? For the most part, progress has been steady, but slower than I would have liked. I am learning that I chronically underestimate how much effort a task will be. The drywall is up, the ceiling is up, all the mudding and painting has been done and the room trim is mostly done. I understand now why paint stores seldom recommend high gloss paint. It shows EVERYTHING. I had those walls so smoooth I could not see ANY blemish after it was primed. And then after the finish coat I could see every seam, every screw hole, every scratch that was filled in. Crazy. It's took a while and several attempts to get it to not look too terrible on close inspection. I also continue to hate metal stud framing for walls. Hate with a passion. I thought that perhaps once the drywall was up, it would stiffen the walls up. I was wrong. On the finished wall I can press in and get at least 1/2" flex in the middle. Man am I not happy about that. For the rest of the basement I will have to either reframe it with wood or at least use 2x3's and double up the framing before drywalling. The other reason you want to preblock with wood is that if you want to attach things like floorboard with nails, there isn't a nail in the world that can grab that metal framing. So you have glue the floorboard on instead. Putting everything I could think of against the floorboards as the glue set still wasn't enough, they bowed out some in places so I had to use paintable caulking to fill the gaps. It's a learning experience. Here we are at the doorway looking in. As you can see the drywall is up, tiles around the sink area, and the ceiling dropdown is finally finished up. It's actually painted plywood up there instead of drywall to work with the tight tolerances. 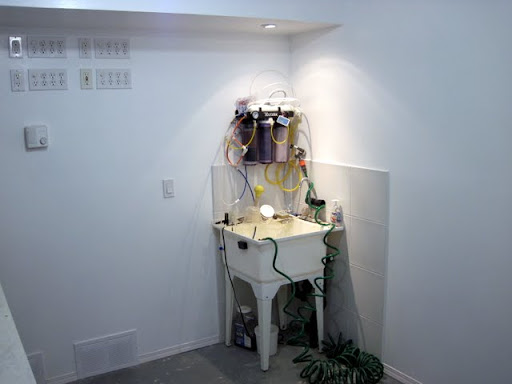 A closeup of the sink work area. There is a 2x8 under the drywall to hold the RO/DI up. It's one solid mounting. Too bad that AS was I mounting it, it slipped and landed on the TDS meter. The canisters help up luckily but the TDS meter is toast. I haven't replaced it yet but did at least buy the replacement (you can see it in the bag still on the little shelf thing).  I had to cut the drain pipe out and redo the whole dang thing to allow the sink to sit flush against the drywall. Again, more swear words.  A look towards the tank from the back of the room. Where I'm standing will eventually house the 110g cube which at this point I'm thinking of keeping for a little while as I'm considering not moving my eel and butterflies into the 280g. The butterflies are too destructive; and the eel is not appreciating the company of his tank mates these days. I can only feed him at night when the rest are sleeping or in the morning before I go to work and the lights haven't turned on yet. Anyhow you can see the light rails are back up and the plumbing is started. 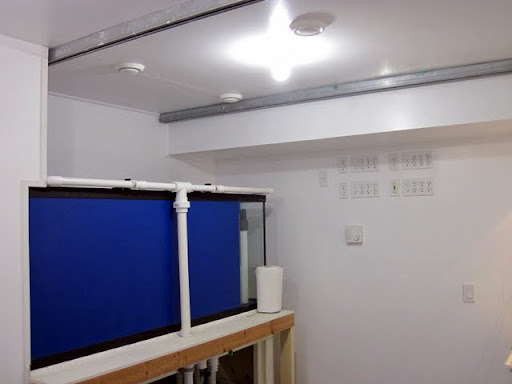 Around the tank is painted plywood, the rest of the room is drywall. Where the two meet I covered the seam with a corner moulding seen here. 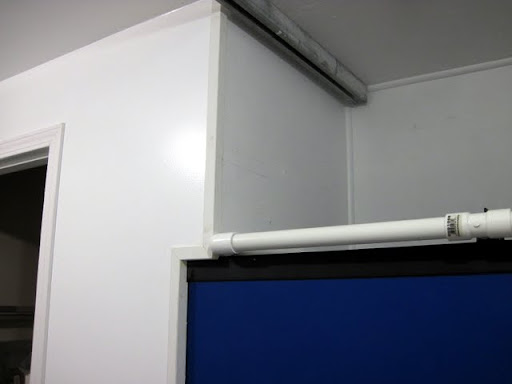 As you can see I still am storing some stuff in the tanks. Ignore the bags in the sump for the time being. They hold stuff which will come into play at a later date. In the meantime here is the plumbing return started. 2" flex PVC to the intake of the Dart, 1.5" flex after that. The hugeness of the 2" tru-union ball valve made it hard for me to visualize how I wanted the plumbing to be but I think I'm happy with this arrangement. I would have preferred not to put a 90 in the intake line but otherwise it would have jutted into the room by a large margin. My old 75g had its pump like this and it ran for like 7 years so I'm hoping it will be OK. 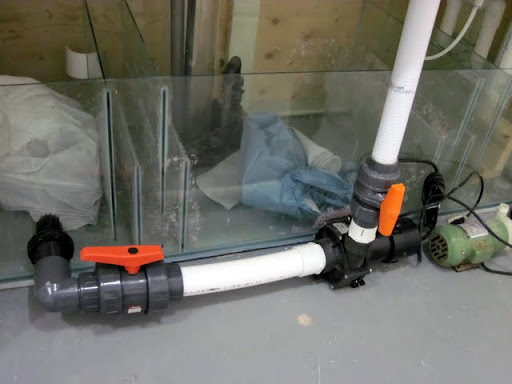 This is the manifold that feeds various outlets. Up goes to the 280g, to the right will go to the frag tank (which will be the 40g semi-cube - 24x24x12 - that right now houses my carpets and clowns. They'll move into the big tank and that will free up that tank for this). The frag tank feed will be a 1" line which right now isn't installed - it will just glue into the valve when I'm closer to working on that part. The other two outlets are for a 1/4" line (just for the heck of it - but it might be useful for drip acclimations) and another outlet that's just capped for now - it's there in case I ever want to run another line to somewhere down the road. 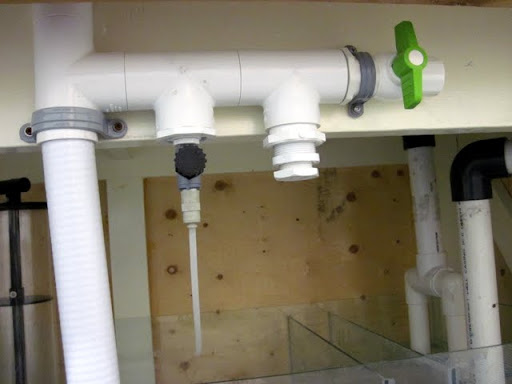 A look at the delivery manifold loop. 4 3/4" locline outlets, two at the front and two at the rear and two 3/4" outlets (capped off for now) in case I ever want more down the road. 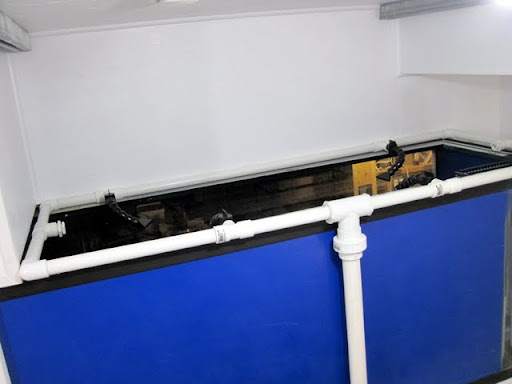 The Herbie overflow. A wet test will tell me if I need to shorten the pipes. 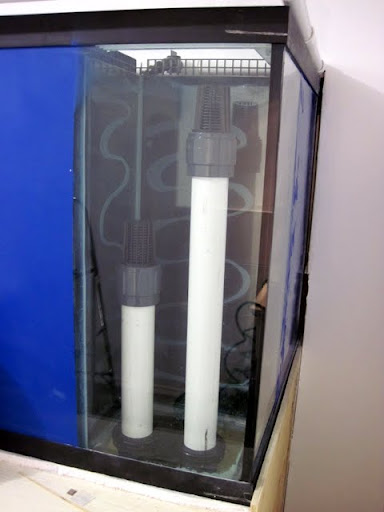 Tight tolerance for the 2" gate valve on the overflow but you can get to it easily enough and adjust it. 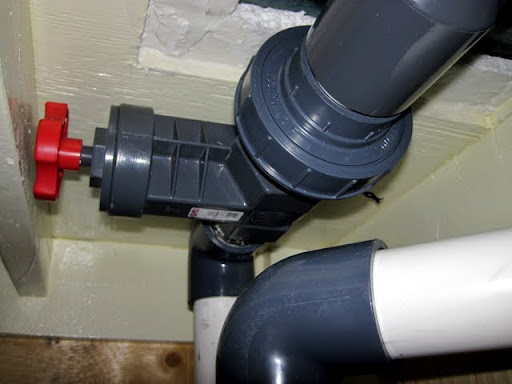 The emergency overflow pipe seen here. 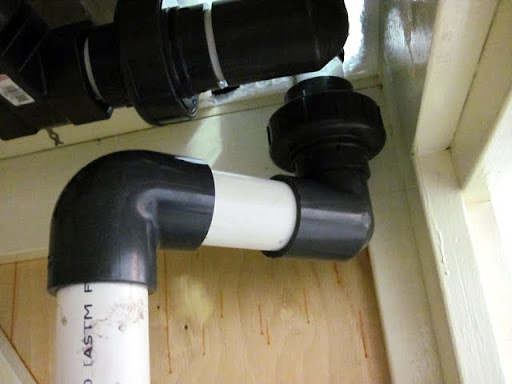 Another look at the overflows draining into the sump. 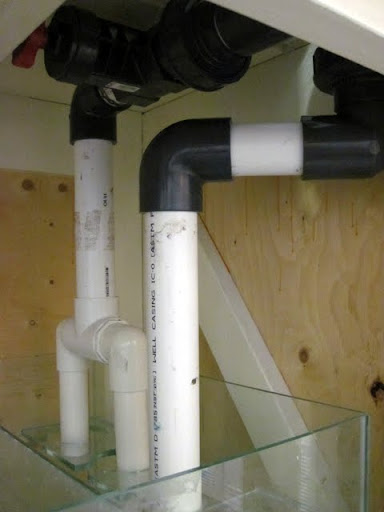 A shout out of thanks to reefcanada for the sock holders. I'm not convinced I'll be happy with the 4" socks but man the glass sock holders are just so damned sexy. 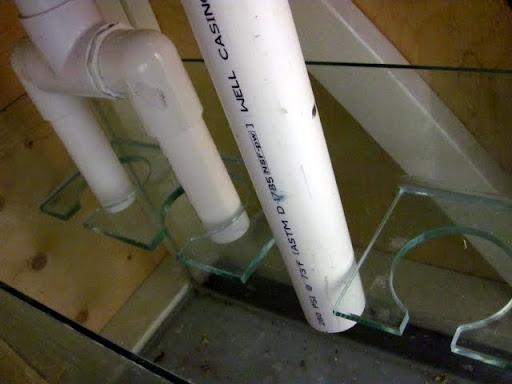 A look under the skirt, er, stand. Here is the span at the back of the tank. There is a 2x8 and a 2x6 glued-n-screwed together supported at the ends with 3 vertical 2x4's each. I am hoping this will hold up and not bow in. I couldn't detect any bowing when I had the tank filled last, so hopefully it's OK. 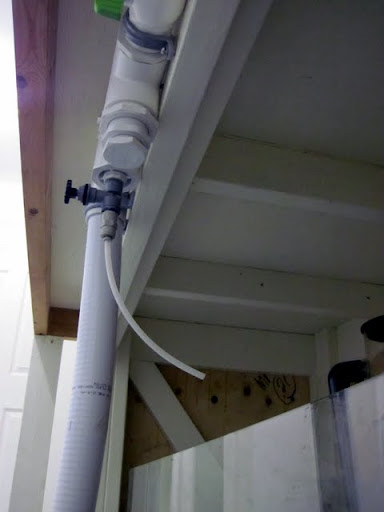
__________________
-- Tony My next hobby will be flooding my basement while repeatedly banging my head against a brick wall and tearing up $100 bills. Whee!
|
|
#245
09-10-2010, 07:45 AM
|
|||||
|
|||||
|
So, next on the radar is the plumbing for the skimmer. I have Canadian Man's old DIY beckett skimmer that has been waiting to be put back to use for a few years now.
Plumbing is such an interesting exercise. I both love and loathe it at times. It's like putting together a jigsaw puzzle but you don't know what the end picture will look like. This was my first thought on how I'd run the line. I'm using 1.5" line that will step down to 3/4" for the GenX/Mak4 pump intake. 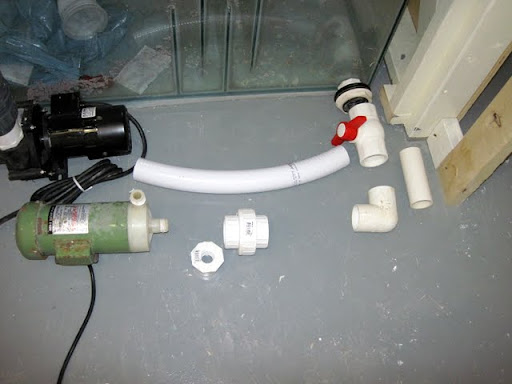 ... But I just didn't like it. It wasn't speaking to me. So I ended up picking up a few different pieces and am right now thinking about something like this instead: 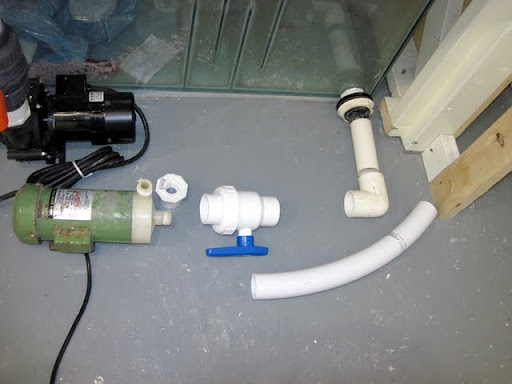 I've had the red handled valve in my junk drawer for years and was excited to use it again. But the problem is the threaded ends means threaded-to-slip adapters are needed and it just adds to the overall length needed. I want flex PVC involved to suck up pump vibration and also compensate for any alignment issues but flex PVC is defeated if you don't have a long enough run. So, a switch to a half-union valve from Western Pump (man I love that store, more on this later) and hopefully a pump feed arrangement I can live with. Here's a look at the skimmer itself. 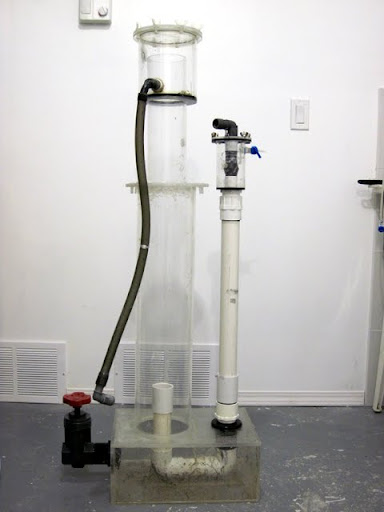 Jonathan didn't have a gate valve and I've been wanting to add one to this skimmer forever. So finally here I am and I've done it! Haha! WOOHOO! .. but .. in the "I don't know WHAT I was thinking" category, I ordered a threaded gate valve instead of a slip. I was probably thinking "this way I can reuse it later!" ... but the problem is all those threaded to slip adapters just keep adding length and more length to the pipe (holy that sounds terrible) but I want a lower profile on that sort of thing. Again, Western Pump to the rescue with stuff like this: 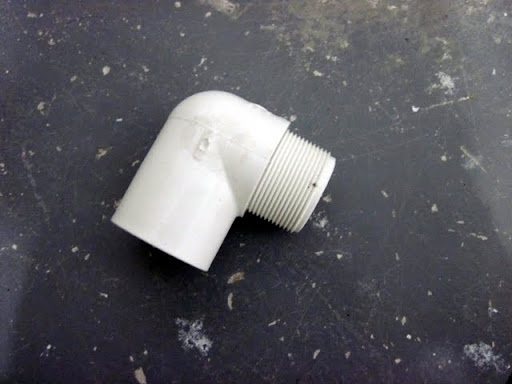 .. and this: 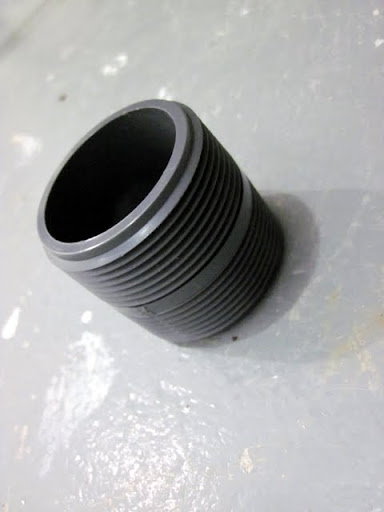 The close nipple will sit inside the bulkhead and that is a challenge in itself. I used a copious amount of "heavy bodied" PVC cement and am hoping that it will seal up. If it does, the valve can then just thread on and off the bulkhead as needed. A second option would have been to add a threaded to slip adapter but again it just makes the pipework huge and a bother to work around. The male threaded elbow just goes into the other side of the valve and drains down into the sump. On the topic of draining down .. another one from the "I don't know what I was thinking." Remember that most of this stuff happens late at night - don't judge me! Can you see where this is going? Well, I'll give you a hint: doing it that way was not smart. 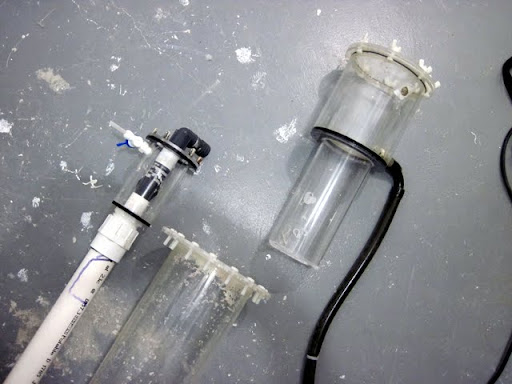 Ouch. There was a time I might have reacted with swear words but at this point I'm more just "ugh, now I need some weldon. This will also undoubted push back the wet test." So a trip to Industrial Paints and Plastics today was in order because I was out of Weld-On 16 (I use a LOT of that stuff fixing stuff and toys that the boys break. Man if the butterflies are destructive to a reef, they don't hold a candle to a 5 year old and a 2 year old, and the damage they will do to a household.) But, it's given me the thought that sometimes things like this are an opportunity. One thing about this skimmer that I worry about is, well, let me just show you. This: 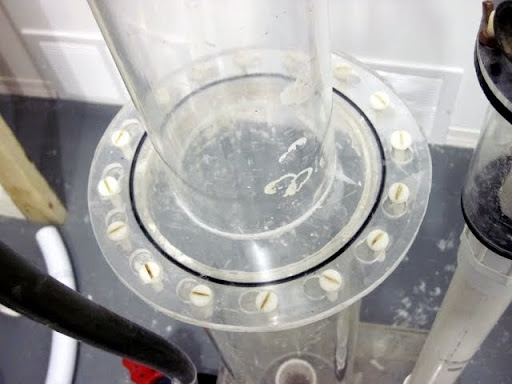 My goodness that is a lot of screws. It will take forever to take this apart to clean and put back together and I'll need a screwdriver to boot. I am tempted to see about replacing the flanges to something that uses maybe 3/8" acrylic and no more than say 8 thumbscrews. And keyholed screw holes so it can just twist off. Only problem with that is I don't want to make them. At one point Barr Aquatics was selling ready made flanges but unfortunately his reseller, Austin Aquatics, has gone out of business. I put in an email to Brent a couple days ago but no reply. I'm not sure if he's still doing acrylic fabrication for the hobby. So I might be looking around at some point to see if someone can make me some. I might even talk to Industrial Paints and Plastics about that. It would be a good opportunity to install a second flange at the bottom of the reaction chamber so that the skimmer can be taken apart for cleaning. On the topic of cleaning .. I always wondered where people get muriatic acid to clean out things like skimmers. Today I was at Western Pump and thought .. hey I wonder if people use that stuff to clean out pools. Lo and behold - they do! $16 later I have a gallon of 35% muriatic acid. Dirty skimmers beware! The top of the skimmer cup as well could probably stand to be reflanged with something that includes keyholed openings for the bolts: 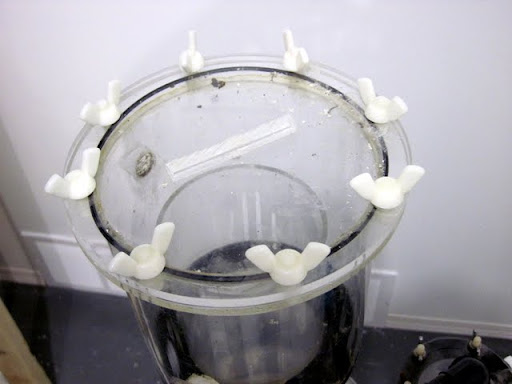 .. as well as the injector housing:  It's just that, in my experience, when something becomes a drag to do, it gets pushed off. And it's a slippery slope between "I'll clean that out tomorrow" and "why does my tank look like crap?" ... .. but it's a balance point too. I don't want to re-engineer the entire skimmer. At some point it might just be further ahead to say "to heck with it" and buy a new skimmer. The problem with that of course is funds or more specifically a lack thereof. So the initial plan will be to just fix the break for now, and worry about "making it better" later on.
__________________
-- Tony My next hobby will be flooding my basement while repeatedly banging my head against a brick wall and tearing up $100 bills. Whee!
|
|
#247
09-10-2010, 03:53 PM
|
|||||
|
|||||
|
Update looks awesome to me Tony. I think you were the one to say to me 'it photographs well' and we can't see and imperfections in yoor walls so you're actually allowed to pass it all off as perfect. Disclaimers for those that visit in person. Those are the rules man!
See what you mean about that brace and your pump. Just roll with it as is and 'see what happens' I'm sure you're fine. The skimmer looks like a nightmare to take care of and I can only say good luck. You'll have to weigh the cost of the custom fabrication against something that's good value for the money like SWC etc. Or maybe it's worth it for now to just suffer the screws and do the weld-on thing? Good points about threaded fittings. I went that route as well this time and yeah why bother worrying about re-use. It meants buying a ton more threaded parts to get to a slip fitting anyways. All slip again for me the next time around (years away!). Looks like a really nice fishroom though I'm jealous as frag.
|
|
#248
09-10-2010, 04:49 PM
|
|||||
|
|||||
|
Thanks Brett and Mitch! It's finally nice to see a room with drywall. I want to hurry up and move the fish over so I can finish up the rest of the basement. Living in the construction zone for this long is starting to get a little old.
And yeah, Brett, I think you're right about the skimmer. Might just be further ahead to just fix it for now and get it going and just save up for a replacement sooner rather than later. It is a good skimmer, the tank it was on was a 230 with a 75g add-on and it seemed to handle the load well. So it should at least be able to get me started and I can worry about the rest later on.
__________________
-- Tony My next hobby will be flooding my basement while repeatedly banging my head against a brick wall and tearing up $100 bills. Whee!
|
|
#250
09-10-2010, 06:00 PM
|
|||||
|
|||||
|
Nice work Tony, looks great. Save some room for froggies and fruit flies.
What are you planning for water mixing and top up?
__________________
Brian ____________________________________________ 220g inwall 48"x36"x30" 110g mangrove refug/sump Poison Dart Frog Vivarium
|


 Linear Mode

