Canreef Aquatics Bulletin Board  

Go Back   Canreef Aquatics Bulletin Board > General > Tank Journal

Reply
 
Thread Tools Display Modes
  #31  
Old 11-07-2012, 02:46 AM
scubadawg scubadawg is offline
Member
 
Join Date: Dec 2011
Location: Edmonton
Posts: 283
scubadawg is on a distinguished road
Default

Quote:
Originally Posted by sphelps View Post
This should be more clear, it's basically beananimal which is a herbie overflow with an extra drain and a standpipe.


You can set the operating water level height by the height of the standpipe, it's low in this example but it gives you the idea. See previous durso image for standpipe details.
Thanks
In the original way I have it setup is exactly as your diagram except my left tube, I have a straight pipe like the right side, I do have a ball valve there, you can see it between the 2 unions, so basically I just need a T fitting for the durso.
Reply With Quote
  #32  
Old 11-07-2012, 02:57 AM
Werbo Werbo is offline
Member
 
Join Date: Oct 2003
Location: Victoria, BC
Posts: 436
Werbo is on a distinguished road
Default

Tagging along.
Sphelps you drawing is excellant and answers many of my questions. Thx.
Reply With Quote
  #33  
Old 11-07-2012, 03:59 AM
sphelps's Avatar
sphelps sphelps is offline
Member
 
Join Date: May 2006
Location: Lyalta, East of Calgary
Posts: 4,777
sphelps is on a distinguished road
Default

Quote:
Originally Posted by scubadawg View Post
Thanks
In the original way I have it setup is exactly as your diagram except my left tube, I have a straight pipe like the right side, I do have a ball valve there, you can see it between the 2 unions, so basically I just need a T fitting for the durso.
Yeap that's cause I drew it up just for you. The ball valve won't serve much purpose but it's already there so no point taking it out. Just watch your heights, the primary needs to be a decent amount below your operating water level to prevent a vortex and your back up can't be too high either otherwise it won't take the full flow. Things look a bit high in your pics but its hard to tell.
Reply With Quote
  #34  
Old 11-07-2012, 04:18 AM
scubadawg scubadawg is offline
Member
 
Join Date: Dec 2011
Location: Edmonton
Posts: 283
scubadawg is on a distinguished road
Default

Quote:
Originally Posted by sphelps View Post
Yeap that's cause I drew it up just for you. The ball valve won't serve much purpose but it's already there so no point taking it out. Just watch your heights, the primary needs to be a decent amount below your operating water level to prevent a vortex and your back up can't be too high either otherwise it won't take the full flow. Things look a bit high in your pics but its hard to tell.
In the photo of post 26 could I just drill a hole instead of using a T fitting? and put a valve there,or is it better getting a T?

Thanks
Yung
Reply With Quote
  #35  
Old 11-07-2012, 01:28 PM
FishyFishy!'s Avatar
FishyFishy! FishyFishy! is offline
Gold Member
 
Join Date: Sep 2010
Location: Calgary SE
Posts: 1,674
FishyFishy! will become famous soon enough
Default

Quote:
Originally Posted by scubadawg View Post
In the photo of post 26 could I just drill a hole instead of using a T fitting? and put a valve there,or is it better getting a T?

Thanks
Yung

Definatly use a T fitting with a cap on the end. Think if this drain as a Durso style pipe. You'll want the air space above the water flow. Drill a hole in the top of the end cap, and put an air line/valve in the top to control air intake.
__________________

They call it addiction for a reason...
Reply With Quote
  #36  
Old 11-07-2012, 01:39 PM
FishyFishy!'s Avatar
FishyFishy! FishyFishy! is offline
Gold Member
 
Join Date: Sep 2010
Location: Calgary SE
Posts: 1,674
FishyFishy! will become famous soon enough
Default

This is a breakdown of a proper one.


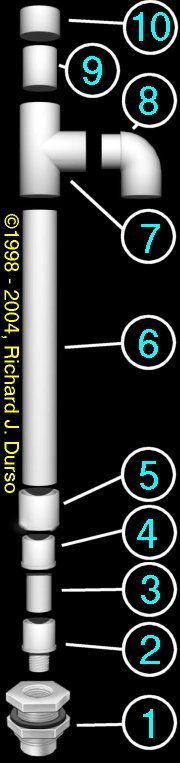
#10 - 1¼ PVC End-Cap with vent hole.
#9 - Connector made of 1¼ PVC. Glue to Tee, Teflon taped top for snug fit with End-Cap.

#8 - 1¼ PVC Street-Ell. Trim the connector for a compact design to help fit into smaller overflow chambers. Glued into Tee fitting. This is the water intake for the standpipe. Water level would be expected to be around the middle of this fitting.

#7 - 1¼ PVC Tee. Do not glue this onto the standpipe. Use Teflon tape on the standpipe for a snug fit. This allows it to be removed for height adjustment or maintenance.

#6 - 1¼ PVC Pipe. Sized long enough to get the End-Cap just about equal to the upper rim of the display tank.

#5 - 1¼ PVC Coupling. The stand pipe and reducer bushing are glued to this part.

#4 - 1¼ to 1 inch reducer bushing.

#3 - Connector made of 1 inch PVC. This should be glued into the reducer bushing. If you have a slip bulkhead, this inserts directly into the bulkhead — use Teflon tape for snug fit into the bulkhead.

#2 - OPTIONAL: 1 Inch PVC Male adapter - only needed on threaded bulkheads. You may want to attach to connector with Teflon tape to allow for a quick yank removal from bulkhead. Use Teflon tape on threads before inserting into bulkhead.

#1 - Bulkhead. The opening at the bottom of your overflow chamber to allow water to drain out to the sump. This drawing shows a threaded bulkhead.
__________________

They call it addiction for a reason...
Reply With Quote
  #37  
Old 11-07-2012, 01:48 PM
sphelps's Avatar
sphelps sphelps is offline
Member
 
Join Date: May 2006
Location: Lyalta, East of Calgary
Posts: 4,777
sphelps is on a distinguished road
Default

You could try it without the tee, since you're really just putting a small amount of flow through it, it probably won't matter much. Could always add the tee later.

Don't forget about the other option I mentioned regarding a straight herbie overflow with two back ups. Would look like this:

Reply With Quote
  #38  
Old 11-07-2012, 01:56 PM
sphelps's Avatar
sphelps sphelps is offline
Member
 
Join Date: May 2006
Location: Lyalta, East of Calgary
Posts: 4,777
sphelps is on a distinguished road
Default

The other option is remove that third overflow pipe all together and close the ball valve. Run the piping after the valve to a hose or something you can stick in a bucket or drain. This way you can use it as a manual drain for draining your overflow and removing water for water changes.

Reply With Quote
  #39  
Old 11-07-2012, 02:21 PM
FishyFishy!'s Avatar
FishyFishy! FishyFishy! is offline
Gold Member
 
Join Date: Sep 2010
Location: Calgary SE
Posts: 1,674
FishyFishy! will become famous soon enough
Default

Quote:
Originally Posted by sphelps View Post
You could try it without the tee, since you're really just putting a small amount of flow through it, it probably won't matter much. Could always add the tee later.

Don't forget about the other option I mentioned regarding a straight herbie overflow with two back ups. Would look like this:


I like this option the best. I would leave the second back up drain threaded so that if you wanted to drain the overflow to clean it, you would just un screw the drain pipe and re-open the ball valve to drain it. Would make for nice easy cleaning with the safety of redundancy
__________________

They call it addiction for a reason...
Reply With Quote
  #40  
Old 11-07-2012, 04:19 PM
scubadawg scubadawg is offline
Member
 
Join Date: Dec 2011
Location: Edmonton
Posts: 283
scubadawg is on a distinguished road
Default

Quote:
Originally Posted by FishyFishy! View Post
I like this option the best. I would leave the second back up drain threaded so that if you wanted to drain the overflow to clean it, you would just un screw the drain pipe and re-open the ball valve to drain it. Would make for nice easy cleaning with the safety of redundancy
Hi FishyFishy

This is the original way I have it, all my bulkheads are slip fitting, the main line in the photo with strainer is with a gate valve, the center is not restricted right to the sump, the far pipe with strainer is the secondary has a ball valve.

I am ordering a T for the durso, that will slip in where the secondary is.

I designed this to be flexable.
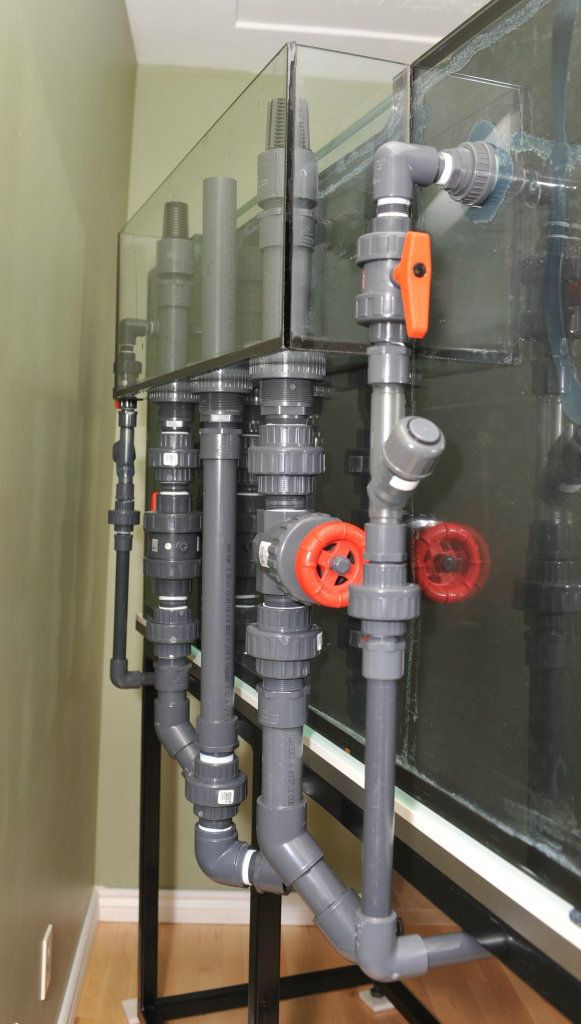


Reply With Quote
Reply


Posting Rules
You may not post new threads
You may not post replies
You may not post attachments
You may not edit your posts

BB code is On
Smilies are On
[IMG] code is On
HTML code is Off
Forum Jump


All times are GMT. The time now is 01:03 AM.


Powered by vBulletin® Version 3.7.3
Copyright ©2000 - 2024, Jelsoft Enterprises Ltd.