
|
|
|
#1
 08-24-2012, 01:20 AM
|
||||
|
||||
|
Hello folks,
I actually started this transition at the beginning of the month but haven't had the time to post anything about it. I moved to a new house recently and took the opportunity to upgrade my tank from a 65 gallon to a 110 gallon x-tall. Spent the last few months getting equipment from all over (you guys know who you are!) I tried to take the opportunity to get the dream-team of gear, and it's been pretty successful. Firstly, most of the gear and the new tank:   Picked up 2 AI SOLs off Martin at Modular LED and had two fixture rails made. The back of the tank stand was mostly open and only has about a 4" lip, I decided to drill the fixtures through the stand that so I could easily access the bolt for adjustments if I ever needed to (and it looks a lot cleaner too). Here was a progress shot and how it looks from inside:   I also installed a GFCI in the tank location. Got an RO/DI from Aquasafe and installed that sucker in the laundry room, I've got a float valve drilled into a garbage can for a reservoir. Had a mix up with some of the parts when I bought it, contacted them and they're mailing me what I needed. Also the very first valve was missing an o-ring which caused me to wash the walls when I tried to flush the pre-filters.   Shot of my plumbing work (overflow and returns were already drilled, I did the work from the elbows/threaded unions down, I've since removed a few of the slip unions from previous owners as I wanted as little clutter as possible. Pretty good for my first real attempt at plumbing of any kind. Note my PVC spacers for the AI fixtures... because the support rail is so thin the weight of the lights + fixtures caused a bit of torque on the thin wood so I offset it with that creation.   The gate valve was recycled from the previous owner, tiny gap in the saved piece caused a hilarious whistle that I had to fix with some plumbing tape, it caused the herbie to oscillate as well. Loading 'er up took a few days w/50GPD filter and 3 garbage cans, you can see in the background I got smart and started a siphon in multiple cans so I could fill them all up at the same time without switching anything around:  Luckily I had sold or given away a bunch of my livestock as the move was unfortunately stressful (only had my gf to assist and it was a super hot week with a couple days delay before I could get the tank fully running.) I lost my big toadstool and sinularia colonies and my foxface I think had a panic attack while in transport. I tore out all the invasive corals so I could start as fresh as possible. I went from almost no visible rock to the opposite. It sucks but there wasn't much I could do. Old:  New:   I haven't hooked everything up yet, still mulling it over a bit. Sorry I couldn't pace out a follow along! It's been up a week, no signs of any cycling issues, etc. Vitals: 110 gallon x-tall 40br sump 120 lbs select sand + 40lb top layer oolite (semi-regretting it, but got it for free from my buddy) and roughly 120lbs live rock mostly from my mature tank. 2x AI SOL Super Blue 6212 Wavebox 1x mp40w (junker koralia placeholder for 2nd one at the moment) Eheim Compact 5000+ return Vertex IN-180 Skimmer Eheim 250W heater BRS sock holder I have but haven't set up: 25W UV Neptune Apex Dual chamber calc reactor Osmolator ATO TLF150 media chambers, also have a HOB fuge for something TBD. Test SPS colony, got it cheap since it was browned out. We'll see how it does!  Last edited by MKLKT; 08-24-2012 at 01:28 AM. 
|
|
#2
08-24-2012, 03:48 AM
|
|||||
|
|||||
|
Nice, looks great! I was wondering what kind of tank those extra long arm's where going on.
__________________
Feed the bear goodies, make a new friend, don't feed the bear............... 8' - 165gal Reef DIY LED's Build 2012 Nano Contest Winner Febuary 2013 POTM Winner 300 gal + 60 gal Complete DIY Build
|
|
#4
08-24-2012, 04:17 AM
|
|||||
|
|||||
|
Quote:
__________________
Feed the bear goodies, make a new friend, don't feed the bear............... 8' - 165gal Reef DIY LED's Build 2012 Nano Contest Winner Febuary 2013 POTM Winner 300 gal + 60 gal Complete DIY Build
|
|
#5
08-24-2012, 03:48 PM
|
||||
|
||||
|
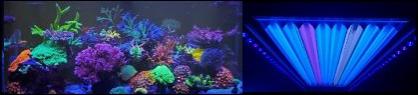
I measured it out and the max height possible was the same as what I needed. Thanks, they're great! The LEDs are good so far, they were advertised as being effective to 30" and that's what I've got. (Aqua gloves aren't long enough to reach the bottom; it spills over if I stretch) I will know better after assessing the coral growth. At 30% the sand is still almost blinding. There's a devils hand near the bottom and it's pretty happy, tough to say whether more or less effective light is getting down there though.
Quote:
|
|
#6
09-07-2012, 04:19 AM
|
||||
|
||||
|
So I got my first Tang the other day, sold as a Blackspot Tang, although it's colouration is way different at home than in store (better at home). I'm pretty sure it's Acanthurus nigrofuscus but not 100% certain. Here's a the tang posing with the Devil's Hand that survived the move and the resident Starry Blenny:
 '80s neon shot  I've got test frags of different types of corals to see how they like the flow, lighting and water quality, so far after about 3 weeks running it all seems to be going great. Corals have good feeding responses and colouration. The metallic GSP I kept from the old tank is like 95% bleached but polyps are now out finally and I'm sure it'll come back. I've now got: 3 different kinds of zoas (yellow, orange and pink) chunk of rainbow monti 4 headed green candycane single head of green frogspawn tiny pink acro Pink w/green spot chalice frag large browned out milli, green bird's nest hitchhiker on the base (trying to colour the milli up, it's happy though otherwise) devil's hand a few mushrooms and GSP I set up my Apex and got my 2nd mp40, gotta program the Apex and dial in all my settings. Really happy with the new gear. Last edited by MKLKT; 09-07-2012 at 04:32 AM.
|
|
#7
09-07-2012, 01:20 PM
|
|||||
|
|||||
|
Looking good!! I like the tall tanks. My 131 is a tall tank too. I found it a little tuff to aquascape, but they look killer when you do them right.
Keep up the solid work!
__________________
 They call it addiction for a reason...
|
|
#8
09-07-2012, 02:50 PM
|
||||
|
||||
|
Quote:
I got some aqua gloves when I was moving all the rock (thank god I did, had some badass bristleworms in there) but even they aren't long enough to avoid getting water inside when I reach to the bottom.
|
|
#9
09-07-2012, 03:01 PM
|
|||||
|
|||||
|
Looks great! I think it's a bit of a shame the return lines are drilled so low but I guess you'll just have to work with it. Just watch your creep back-flow as lockline doesn't really seal 100% at the joints, might want a check valve. Another alternative is to replace the first fitting on the inside with an PVC elbow and hard pump it up in the tank a little before using your lock-line, that way you'll be able to point your nozzles down making them more useful and should also be less obtrusive.
Would think with those light supports you could run the power wires and such through the tube. Is that not possible?
|
|
#10
09-07-2012, 03:18 PM
|
||||
|
||||
|
Quote:
I want to say there was a reason I didn't put the wires through the tube, maybe I just put it off as a to-do when I installed the controller. Either that or I had already ratcheted the lights on and couldn't squeeze the cable past the bolt. I do at least have a cable hole drilled beside the return lines. 
|


 Linear Mode

